Ai Overview
Smart contract frontend integration refers to the process of connecting web-based user interfaces with blockchain smart contracts, enabling users to interact with decentralized protocols through familiar browser experiences. State-changing transactions require careful handling since they cost gas and are irreversible. Add a buffer (10-20%) to the estimate for safety. Users reject transactions for various reasons including cost concerns, accidental triggers, or security caution.
Key Takeaways
- Web3.js frontend integration connects JavaScript applications to Ethereum blockchain, enabling users to interact with smart contracts through familiar web interfaces.
- Prerequisites include the smart contract ABI, deployed contract address, RPC provider URL from Infura or Alchemy, and wallet setup like MetaMask.
- The .call() method reads blockchain data without gas fees, while .send() executes state-changing transactions requiring user signatures and gas payment.
- Web3.js smart contract integration requires proper provider configuration using either HTTP for basic calls or WebSocket for real-time event subscriptions.
- Error handling must address common issues including user rejection, insufficient funds, wrong network selection, and ABI mismatch problems.
- Event listeners enable reactive UI updates when blockchain state changes, essential for creating responsive decentralized applications.
- Security best practices include input validation, using verified ABIs, protecting against phishing, and thorough testnet testing before mainnet deployment.
- Gas estimation and price handling ensure transactions complete successfully while providing users with accurate cost information before confirmation.
- Web3.js integration services help teams across USA, UK, UAE, and Canada build production-ready dApps with proper architecture and security.
- Choosing between Web3.js and Ethers.js depends on project complexity, bundle size requirements, TypeScript needs, and team familiarity.
What Does Smart Contract + Frontend Integration Mean?
Smart contract frontend integration refers to the process of connecting web-based user interfaces with blockchain smart contracts, enabling users to interact with decentralized protocols through familiar browser experiences. This integration layer translates user actions like button clicks into blockchain transactions and displays on-chain data in readable formats. Without this bridge, users would need to interact directly with blockchain nodes using command-line tools, making decentralized applications inaccessible to mainstream audiences.
Why dApps Need Frontend + Blockchain Connection?
Decentralized applications require frontend integration to provide usable interfaces for non-technical users. Smart contracts execute business logic on the blockchain, but they have no native user interface. The frontend creates the visual layer where users see their token balances, initiate transactions, and monitor activity. This connection transforms complex blockchain interactions into intuitive experiences. A well-integrated frontend handles wallet connections, transaction signing, confirmation monitoring, and error messaging, abstracting blockchain complexity while maintaining the security and transparency benefits of decentralized systems.
What Web3.js Does in a dApp?
Web3.js serves as the communication layer between JavaScript frontend code and Ethereum blockchain nodes. The library provides methods to connect to blockchain networks, instantiate smart contract objects, call contract functions, send transactions, and subscribe to events. When a user clicks a button to transfer tokens, Web3.js encodes the function call, requests the user’s wallet signature, broadcasts the transaction to the network, and monitors its confirmation. This comprehensive functionality makes Web3.js the foundation for most Ethereum frontend integrations.
Frontend vs Smart Contract Roles
Frontend Role
- Display blockchain data to users
- Collect user inputs and actions
- Handle wallet connections
- Show transaction status
- Provide error feedback
Smart Contract Role
- Execute business logic on-chain
- Store and manage state data
- Validate transaction rules
- Emit events for tracking
- Enforce access controls
Web3.js Bridge
- Encode function calls
- Request wallet signatures
- Broadcast transactions
- Parse contract responses
- Subscribe to events
Prerequisites Before Using Web3.js
Before starting Web3.js frontend integration, ensure you have the necessary knowledge, tools, and resources. Proper preparation prevents common integration issues and accelerates the process. Teams across USA, UK, UAE, and Canada regularly engage Web3.js integration services when lacking internal blockchain expertise, but understanding these prerequisites helps evaluate project readiness.
Basic Knowledge
Successful Web3.js integration requires foundational knowledge across several domains. JavaScript proficiency is essential since Web3.js is a JavaScript library. Understanding async/await patterns matters because blockchain calls are asynchronous. Basic Solidity knowledge helps interpret smart contract ABIs and understand function behaviors. Familiarity with Ethereum concepts like gas, transactions, blocks, and addresses provides context for integration decisions. While deep expertise is not required, these fundamentals prevent confusion during implementation.
Smart Contract ABI and Contract Address
The Application Binary Interface (ABI) is a JSON file describing the smart contract’s functions, inputs, outputs, and events. Web3.js uses the ABI to encode function calls correctly and decode responses. You obtain the ABI from the contract compilation output or verified contract sources on block explorers. The contract address identifies where the contract is deployed on the blockchain. Both mainnet and testnet deployments have different addresses. Store these values securely and version them with your frontend code to maintain synchronization.
RPC Provider and Network Selection
RPC (Remote Procedure Call) providers give your frontend access to blockchain nodes without running your own infrastructure. Services like Infura, Alchemy, and QuickNode offer reliable RPC endpoints for Ethereum and other EVM chains. Select providers based on rate limits, geographic distribution, and feature requirements. Network selection depends on your deployment stage: use testnets like Sepolia or Goerli for testing, then switch to mainnet for production. Store RPC URLs in environment variables, never in frontend code, to enable easy switching and protect API keys.
Wallet Setup (MetaMask / WalletConnect)
Users need cryptocurrency wallets to sign transactions and prove ownership of their addresses. MetaMask remains the most popular browser extension wallet, injecting an ethereum provider into web pages. WalletConnect enables mobile wallet connections through QR codes. Your integration should support multiple wallet options to maximize accessibility. Configure development wallets with testnet funds for testing. Understanding the wallet connection flow and user experience helps design intuitive onboarding processes for your dApp.
Setting Up the Project for Web3.js Integration
Project setup establishes the foundation for successful Web3.js frontend integration. A well-organized structure makes code maintainable and debugging easier. These setup steps apply whether you are building with React, Vue, or vanilla JavaScript frameworks.
Installing Web3.js Using npm
Install Web3.js through npm with the command npm install web3. For production applications, pin the version to avoid unexpected breaking changes. Web3.js 4.x represents the latest major version with improved TypeScript support and modular architecture. If maintaining legacy projects, Web3.js 1.x remains widely used. Consider bundle size implications since Web3.js is a large library. Tree-shaking and lazy loading can reduce initial page load impact for performance-sensitive applications.
Creating a Simple Frontend Structure
Organize your project with clear separation between blockchain logic and UI components. Create a dedicated folder for Web3 utilities including provider setup, contract instances, and helper functions. Store ABI files separately for easy updates. Build reusable hooks or services that abstract Web3.js complexity from UI components. This architecture enables testing blockchain logic independently and simplifies maintenance when contracts are upgraded. Keep configuration centralized for easy network switching between environments.
Adding Environment Variables for RPC URLs
Store sensitive configuration like RPC URLs and contract addresses in environment variables. Create .env files for different environments (local, testnet, mainnet) and use libraries like dotenv to load them. Never commit API keys or RPC URLs with authentication to version control. For frontend applications, remember that environment variables are embedded in the build output and visible to users. Use server-side proxies for truly sensitive operations that should not expose credentials to browsers.
Connecting Web3.js to the Blockchain
Establishing the blockchain connection is the first runtime step in Web3.js frontend integration. The connection method determines what operations are possible and how your application interacts with the network. Understanding provider options helps select the right approach for your use case.
Understanding Providers (HTTP vs WebSocket)
Web3.js uses providers to communicate with blockchain nodes. HTTP providers make request-response calls suitable for reading data and sending transactions but cannot receive push notifications. WebSocket providers maintain persistent connections enabling real-time event subscriptions and immediate updates when blocks are mined. Choose HTTP for simple read-heavy applications and WebSocket for applications requiring live updates. Some applications use both: HTTP for basic operations and WebSocket specifically for event listening.
Connecting with MetaMask Provider
MetaMask injects an ethereum provider into the browser’s window object. Detect its presence by checking window.ethereum. Create a Web3 instance with new Web3(window.ethereum). Request account access using await window.ethereum.request({ method: ‘eth_requestAccounts’ }), which prompts the user to connect their wallet. Handle the case where MetaMask is not installed by showing installation instructions. The MetaMask provider automatically handles network switching and account changes, making it ideal for user-facing transactions.[1]
Connecting Using Infura / Alchemy RPC
For read-only operations or server-side calls, connect directly to RPC providers. Create HTTP providers with new Web3.providers.HttpProvider(rpcUrl) or WebSocket providers with new Web3.providers.WebsocketProvider(wsUrl). Infura and Alchemy provide separate HTTP and WebSocket endpoints. Include your API key in the URL or as a header depending on the provider. This connection method works without user wallets, useful for displaying public blockchain data to non-wallet users or for backend services.
Handling Network and Chain ID Issues
Network mismatches cause transaction failures and confusing user experiences. Always verify the connected chain ID matches your expected network. Use web3.eth.getChainId() to retrieve the current chain. Ethereum mainnet is 1, Sepolia testnet is 11155111. When users are on the wrong network, prompt them to switch using wallet_switchEthereumChain or wallet_addEthereumChain methods. Listen for chainChanged events to react when users switch networks. Displaying the connected network prominently helps users avoid costly mistakes.
Loading a Smart Contract in Web3.js
Creating a contract instance enables your frontend to interact with deployed smart contracts. This step transforms the ABI and address into a usable JavaScript object with methods corresponding to contract functions. Proper contract loading is fundamental to all subsequent Web3.js smart contract integration operations.
Importing ABI JSON
Import the ABI file into your JavaScript code using standard import statements or require. The ABI is typically a JSON array describing each function, event, and constructor. Store ABIs in dedicated files named after their contracts for clarity. When contracts are upgraded, update the ABI files and redeploy your frontend. Some teams fetch ABIs dynamically from verified contracts on block explorers, though this adds network dependency and latency to application startup.
Setting Contract Address Correctly
Contract addresses must be valid Ethereum addresses in checksummed format. Use web3.utils.toChecksumAddress() to validate and format addresses. Maintain separate address configurations for different networks since testnet and mainnet deployments have different addresses. Load the appropriate address based on the connected network’s chain ID. Address errors cause silent failures or unexpected behavior, so implement validation during application initialization.
Creating the Contract Instance in Web3.js
Create contract instances with new web3.eth.Contract(abi, address). This returns an object with methods property containing all contract functions. The instance is tied to your web3 provider, so create new instances if the provider changes. For applications interacting with multiple contracts, create separate instances for each. The contract instance provides both .call() and .send() methods for each function, though only appropriate methods will succeed based on function types.
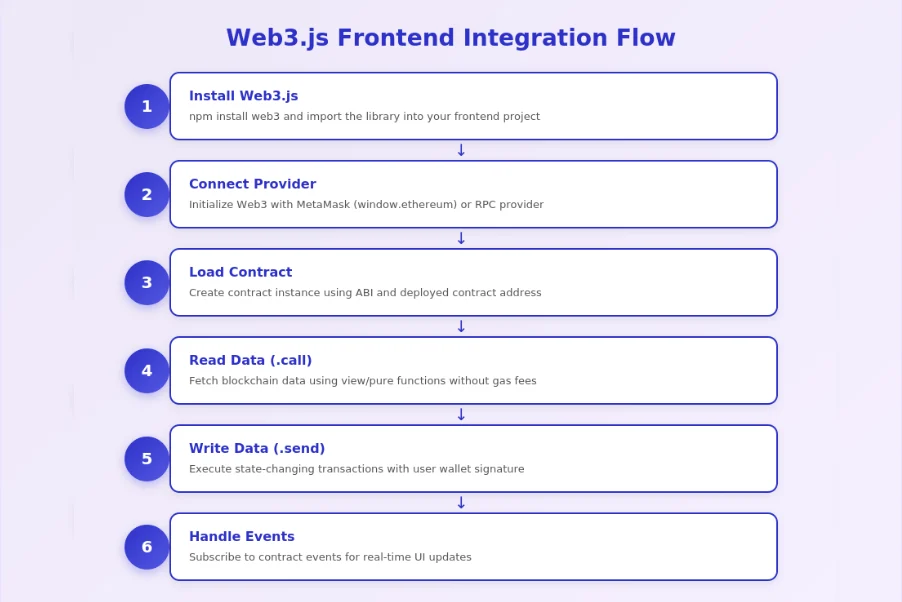
Web3.js Contract Integration Flow
1. Import ABI
Load the contract ABI JSON file into your frontend application.
2. Configure Address
Set the correct contract address for the connected network.
3. Create Instance
Instantiate the contract object using new web3.eth.Contract().
4. Call Methods
Use .call() for reads and .send() for transactions on the contract.
Reading Data from Smart Contracts
Reading blockchain data is the most common operation in dApps. Understanding how to use Web3.js call methods efficiently enables responsive user interfaces that display accurate contract state. These operations are free since they do not modify blockchain state.
Using .call() for View and Pure Functions
The .call() method executes contract functions locally without broadcasting transactions. Use it for functions marked view or pure in Solidity. Call syntax is await contract.methods.functionName(args).call(). The response contains the function’s return value. For functions returning multiple values, Web3.js returns an object with indexed and named properties. Call operations execute instantly against the current blockchain state, making them ideal for fetching data to display in your UI.
Fetching Balances and Token Details
Common read operations include fetching token balances, names, symbols, and total supplies. For ERC20 tokens, call balanceOf(address) to get user balances and decimals() to properly format amounts. Remember that blockchain stores values in the smallest unit, so divide by 10^decimals for display. Batch multiple read calls using Promise.all() for efficiency. Cache responses appropriately to reduce RPC calls, but invalidate caches when relevant transactions confirm.
Displaying Contract Data on UI
Transform raw blockchain data into user-friendly formats before display. Convert wei to ether using web3.utils.fromWei(). Truncate addresses for readability while maintaining copy functionality. Format large numbers with appropriate separators based on user locale. Show loading states while calls are pending and handle missing data gracefully. Consider polling intervals for data that changes frequently, or use event subscriptions for real-time updates when important state changes occur.
Handling Errors While Reading Data
Read operations can fail due to network issues, RPC rate limits, or contract errors. Wrap calls in try-catch blocks and provide meaningful error messages. Distinguish between network errors that might be temporary and contract errors indicating incorrect parameters. Implement retry logic for transient failures. Log errors for debugging while showing user-friendly messages in the UI. Test error scenarios during integration to ensure graceful degradation.
Writing Data to Smart Contracts
State-changing transactions require careful handling since they cost gas and are irreversible. Mastering integrate smart contract with frontend transaction flows ensures users can reliably interact with your dApp while understanding what they are signing and how much it costs.
Using .send() for State-Changing Functions
The .send() method broadcasts transactions that modify contract state. Syntax is await contract.methods.functionName(args).send({ from: userAddress, gas: gasLimit }). The from parameter must be an address the user controls through their connected wallet. The method triggers the wallet to display a signing prompt. After signing, the transaction is broadcast to the network. The returned receipt object contains the transaction hash, block number, gas used, and emitted events.
Getting the User Wallet Address
Retrieve the connected wallet address with web3.eth.getAccounts(), which returns an array of available addresses. The first element is typically the active account. For MetaMask, you can also access window.ethereum.selectedAddress. Store the address in application state after successful wallet connection. Listen for accountsChanged events to detect when users switch accounts. Always use the current address for transactions since stale addresses cause failures.
Gas Estimation and Gas Price Handling
Estimate gas requirements before sending transactions using contract.methods.functionName(args).estimateGas({ from: address }). Add a buffer (10-20%) to the estimate for safety. Fetch current gas prices with web3.eth.getGasPrice() or use EIP-1559 parameters for modern transactions. Display estimated costs to users before they confirm. Poor gas estimation causes transaction failures while excessive gas wastes user funds. Modern wallets handle gas automatically, but providing estimates improves user experience.
Transaction Confirmations and UI Feedback
Provide clear UI feedback throughout the transaction lifecycle. Show pending state while waiting for user signature. Display submitted state with transaction hash after broadcast. Update to confirmed state when the transaction is mined. Consider waiting for multiple confirmations for high-value operations. Use .on(‘confirmation’, callback) to track confirmation count. Show block explorer links so users can verify transactions independently. Handle stuck transactions by suggesting gas price increases.

Handling Events and Real-Time Updates
Smart contract events provide efficient notification of state changes. Event handling enables reactive UIs that update automatically when relevant blockchain activity occurs, creating more engaging user experiences without constant polling.
Listening to Smart Contract Events
Subscribe to events using contract.events.EventName({ filter: { param: value } }). The filter parameter enables subscribing to specific event instances. Event callbacks receive the event data including indexed parameters and block information. Use getPastEvents() to fetch historical events for initial data loading. Combine real-time subscriptions with historical queries to build complete activity feeds. Parse event data to extract relevant information for your UI.
WebSocket Provider for Live Updates
Real-time event subscriptions require WebSocket connections. Create WebSocket providers using wss:// URLs from your RPC service. WebSocket connections maintain persistent state, pushing events as they occur. Handle connection drops gracefully by implementing reconnection logic. Monitor connection health with ping/pong mechanisms. Fall back to polling if WebSocket connections fail. Balance between real-time updates and connection overhead based on your application’s needs.
Updating UI After Event Triggers
When events fire, update your application state and UI accordingly. Debounce rapid event sequences to avoid UI thrashing. Validate that events are relevant to the current user before triggering updates. Consider event ordering since blockchain events may arrive out of order during chain reorganizations. Implement optimistic updates that show expected state immediately while waiting for confirmation, then reconcile with actual event data.
Common Issues with Event Subscriptions
Event subscriptions face several challenges. Connection drops silently break subscriptions without error callbacks. RPC providers may rate-limit subscriptions or have different event retention policies. Chain reorganizations can cause events to be reverted. HTTP providers do not support subscriptions at all. Test subscription reliability thoroughly and implement fallback polling mechanisms. Monitor subscription health and reestablish connections proactively when issues are detected.
Common Errors in Web3.js Integration
Even experienced teams encounter common errors during Web3.js frontend integration. Understanding these issues and their solutions accelerates debugging and improves application reliability. The following table summarizes frequent problems teams face.
| Error Type | Cause | Solution |
|---|---|---|
| ABI Mismatch | Contract updated but ABI not refreshed | Re-fetch ABI from compiler output |
| User Rejected | User cancelled wallet prompt | Handle rejection gracefully with message |
| Insufficient Funds | Not enough ETH for gas | Check balance before transaction |
| Wrong Network | Wallet on different chain | Prompt network switch with chain ID |
| RPC Timeout | Provider rate limits or downtime | Implement retry logic and fallback RPCs |
ABI Mismatch and Wrong Contract Address
ABI mismatch occurs when the frontend uses an outdated interface that does not match the deployed contract. Symptoms include failed function calls, incorrect return values, or missing methods. Verify your ABI matches the exact contract version at the configured address. Use block explorers to compare ABIs for verified contracts. Wrong addresses cause calls to fail or return unexpected results from different contracts. Implement address validation during initialization.
User Rejected Transaction
When users click “Reject” in their wallet, Web3.js throws an error with code 4001. Handle this specifically to show appropriate messaging rather than generic error displays. Users reject transactions for various reasons including cost concerns, accidental triggers, or security caution. Provide clear pre-transaction information to reduce rejection rates. Allow users to retry easily after rejection without restarting their workflow.
Insufficient Funds and Gas Issues
Transactions fail if users lack sufficient ETH for gas costs. Check balances before initiating transactions and warn users proactively. Gas estimation failures indicate the transaction would revert, often due to contract logic requirements not being met. Insufficient gas limit causes out-of-gas failures even with adequate balance. Provide gas cost estimates in fiat currency for user-friendly display.
Wrong Network Selected in MetaMask
Network mismatches are among the most common user errors. Your contract exists only on specific networks, so transactions to other chains will fail. Display the connected network prominently and validate it matches your expected chain ID. Use wallet_switchEthereumChain to request automatic switching. For chains not in the user’s wallet, use wallet_addEthereumChain to add network configuration. Block transactions until users are on the correct network.
RPC Rate Limits and Timeout Problems
Free RPC tiers have request limits that busy applications may exceed. Symptoms include failed requests, slow responses, or 429 error codes. Implement request caching to reduce redundant calls. Use exponential backoff for retries. Consider paid RPC tiers for production applications. Configure multiple fallback RPC providers to maintain availability if one fails. Monitor RPC usage to anticipate scaling needs.
Best Practices for Secure Web3.js Integration
Security in Web3.js frontend integration protects users from attacks and builds trust in your application. These practices apply across all dApp implementations and represent lessons learned from security incidents in the ecosystem.
Web3.js Security Standards
Standard 1: Validate all user inputs before including them in contract calls to prevent injection attacks.
Standard 2: Use only ABIs from verified sources like your own compilation output or audited repositories.
Standard 3: Display transaction details clearly so users understand what they are signing before confirmation.
Standard 4: Implement domain verification to protect against phishing sites impersonating your dApp.
Standard 5: Never store private keys or seed phrases in frontend code or local storage.
Standard 6: Use HTTPS exclusively and implement Content Security Policy headers to prevent script injection.
Standard 7: Audit all contract interactions with security experts before mainnet deployment.
Standard 8: Monitor for suspicious activity and implement circuit breakers for unusual transaction patterns.
Input Validation Before Sending Transactions
Validate all user inputs before including them in contract calls. Check addresses are valid using web3.utils.isAddress(). Validate numeric inputs are within expected ranges. Sanitize string inputs to prevent unexpected behavior. Frontend validation prevents wasted gas on transactions that would fail and protects against malformed data. Combine frontend validation with contract-side checks for defense in depth.
Preventing Replay and Phishing Risks
Phishing attacks target users by impersonating legitimate dApps. Educate users about verifying domain names and contract addresses. Implement domain verification that refuses to operate on unknown domains. Use EIP-712 typed signatures that display human-readable transaction details in wallets. Avoid requesting unlimited token approvals that could be exploited later. Consider implementing transaction simulation that shows expected outcomes before confirmation.
Using Contract Audits and Verified ABIs
Only interact with contracts that have undergone professional security audits. Verify contract source code on block explorers matches expected functionality. Use ABIs directly from compilation output rather than third-party sources. When integrating with external protocols, verify their audit status and track record. Audit findings and verification status should be transparent to users. Update integrations promptly when vulnerabilities are discovered.
Protecting Users from Fake Contract Addresses
Attackers deploy fake contracts mimicking legitimate ones to steal funds. Always hardcode official contract addresses in your application rather than accepting them from URL parameters or user input. Display contract addresses clearly so users can verify them against official sources. Implement checksummed address display to prevent address spoofing attacks. Warn users explicitly when interacting with unverified contracts.
Web3.js vs Ethers.js
Developers often choose between Web3.js and Ethers.js for frontend blockchain integration. Both libraries enable similar functionality with different APIs and trade-offs. Understanding their differences helps select the right tool for your project.
| Aspect | Web3.js | Ethers.js |
|---|---|---|
| Bundle Size | Larger (~500KB minified) | Smaller (~120KB minified) |
| TypeScript | Good support (v4+) | Excellent native support |
| API Design | Callback + Promise style | Modern async/await focus |
| Community | Larger, longer history | Growing rapidly |
| Best For | Complex enterprise apps | Modern frontend frameworks |
When Web3.js Is a Better Choice?
Web3.js excels for teams with existing Web3.js codebases or expertise. Its comprehensive API covers edge cases that simpler libraries might not handle. Enterprise applications benefit from Web3.js’s extensive feature set and long track record. Projects requiring specific Web3.js-only features like certain subscription methods may need to use Web3.js. The larger community means more Stack Overflow answers and tutorials available.
When Ethers.js Is a Better Choice?
Ethers.js suits modern TypeScript projects with its superior type definitions. The smaller bundle size benefits performance-sensitive applications. Its cleaner API design reduces boilerplate code. React and Vue projects often prefer Ethers.js for its integration patterns. New projects without legacy constraints increasingly choose Ethers.js. The library’s separation of providers and signers promotes cleaner architecture.
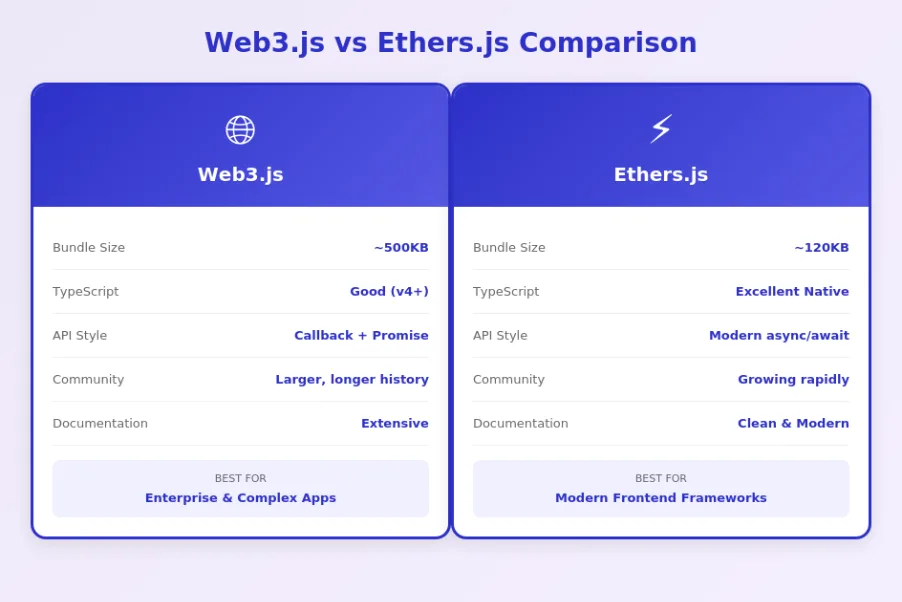
Performance and Experience
Both libraries perform similarly for most operations since the bottleneck is network latency rather than library code. Developer experience differs based on preferences: Web3.js feels familiar to developers from earlier blockchain eras while Ethers.js aligns with modern JavaScript conventions. Some projects use both, leveraging each library’s strengths. Evaluate based on your team’s experience, project requirements, and long-term maintainability considerations.
Final Checklist Before Launching Your dApp
Before deploying your Web3.js integrated dApp to production, thorough verification ensures reliability and user safety. This checklist covers essential steps for teams across USA, UK, UAE, and Canada launching blockchain applications.
dApp Launch Readiness Criteria
Step 1: Testing
- Complete testnet coverage
- All user flows verified
- Error scenarios tested
- Cross-browser validation
Step 2: Security
- Contract audit completed
- Input validation in place
- HTTPS configured
- CSP headers set
Step 3: Monitoring
- Error tracking enabled
- RPC monitoring setup
- Transaction alerts configured
- Analytics integrated
Testing on Testnet
Comprehensive testnet testing is mandatory before mainnet deployment. Test every user flow including wallet connection, contract interactions, error handling, and edge cases. Use testnets like Sepolia that closely mirror mainnet behavior. Test with real testnet transactions rather than mocks to catch integration issues. Involve users outside the team to identify UX problems. Document test coverage and maintain passing tests as regression protection.
Frontend Transaction UX Improvements
Transaction UX significantly impacts user satisfaction and conversion rates. Display clear transaction previews showing expected outcomes and costs. Provide real-time status updates during transaction confirmation. Handle long confirmation times gracefully with progress indicators. Show helpful error messages when transactions fail with actionable suggestions. Enable transaction history viewing and block explorer links. Consider implementing transaction queuing for complex operations.
Monitoring and Analytics Setup
Production dApps require monitoring to detect issues before users report them. Track RPC call success rates and latency. Monitor transaction failure patterns to identify systematic issues. Implement error tracking that captures Web3.js exceptions with context. Set up alerts for unusual activity patterns that might indicate attacks. Analytics help understand user behavior and optimize the experience. Balance privacy considerations with operational needs when collecting data.
Deployment Readiness Checklist
Final deployment verification ensures nothing is overlooked. Confirm contract addresses point to mainnet deployments. Verify environment variables are set correctly for production. Test wallet connections on the production domain. Validate HTTPS certificate installation. Check that error tracking captures issues properly. Ensure fallback RPC providers are configured. Prepare incident response procedures for potential issues. Document rollback procedures in case problems emerge after launch.
Conclusion: Web3.js frontend integration transforms static web pages into powerful decentralized applications. By mastering provider connections, contract instantiation, call and send methods, event handling, and security practices, teams can build reliable dApps that users trust. Whether you are implementing simple token displays or complex DeFi interfaces, these fundamentals apply. Organizations across the USA, UK, UAE, and Canada increasingly rely on professional Web3.js integration services to accelerate their blockchain initiatives. With proper architecture, thorough testing, and attention to user experience, your Web3.js integration will provide the foundation for successful decentralized applications.
Need Expert Web3.js Integration for Your dApp?
Partner with our experienced blockchain team to build secure, scalable frontend integrations for your decentralized applications.
Frequently Asked Questions
Q1.What is Web3.js and how is it used in frontend integration?
Web3.js is a JavaScript library that enables frontend applications to interact with Ethereum blockchain and smart contracts. It provides methods to connect wallets, read contract data, send transactions, and listen to blockchain events. Web3.js frontend integration bridges the gap between user interfaces and decentralized applications, allowing users to interact with smart contracts through familiar web experiences without understanding blockchain complexity.
Q2.How do I connect Web3.js to MetaMask in my frontend application?
Connecting Web3.js to MetaMask involves detecting the injected ethereum provider in the browser window object. You create a new Web3 instance using window.ethereum as the provider, then request account access using eth_requestAccounts method. This prompts users to connect their MetaMask wallet. Once connected, your frontend can access the user’s wallet address and interact with smart contracts on their behalf.
Q3.What is the difference between .call() and .send() methods in Web3.js?
The .call() method reads data from smart contracts without modifying blockchain state, requiring no gas fees or wallet signatures. It works with view and pure functions. The .send() method executes state-changing transactions that modify blockchain data, requiring gas payment and user wallet signature. Understanding this distinction is fundamental for proper Web3.js smart contract integration in frontend applications.
Q4.How do I handle errors in Web3.js frontend integration?
Error handling in Web3.js requires catching specific error types including user rejection, insufficient funds, wrong network, and RPC failures. Implement try-catch blocks around all blockchain calls and provide meaningful error messages to users. Common errors include ABI mismatch when contract interfaces change, gas estimation failures, and MetaMask connection issues. Proper error handling significantly improves dApp user experience.
Q5.What are the prerequisites for Web3.js smart contract integration?
Prerequisites include JavaScript proficiency, basic Solidity understanding, and familiarity with Ethereum concepts. You need the smart contract ABI (Application Binary Interface) defining contract methods, the deployed contract address, and an RPC provider URL from services like Infura or Alchemy. Additionally, users need a wallet like MetaMask installed to sign transactions and interact with your dApp.
Q6.How do I listen to smart contract events using Web3.js?
Web3.js provides event subscription methods to listen for smart contract events in real-time. Use contract.events.EventName() with WebSocket providers for live updates. HTTP providers only support polling through getPastEvents(). Event listening enables reactive UI updates when blockchain state changes, essential for creating responsive dApps that reflect transaction confirmations and contract state modifications immediately.
Q7.Should I use Web3.js or Ethers.js for my frontend integration?
Both libraries serve similar purposes with different approaches. Web3.js offers a comprehensive API with extensive documentation and larger community, ideal for complex enterprise applications. Ethers.js provides a smaller bundle size, better TypeScript support, and cleaner API design, preferred for modern frontend frameworks. Choose based on project requirements, team expertise, and specific feature needs for your dApp.
Explore Services
Related Services
Reviewed by

Aman Vaths
Founder of Nadcab Labs
Aman Vaths is the Founder & CTO of Nadcab Labs, a global digital engineering company delivering enterprise-grade solutions across AI, Web3, Blockchain, Big Data, Cloud, Cybersecurity, and Modern Application Development. With deep technical leadership and product innovation experience, Aman has positioned Nadcab Labs as one of the most advanced engineering companies driving the next era of intelligent, secure, and scalable software systems. Under his leadership, Nadcab Labs has built 2,000+ global projects across sectors including fintech, banking, healthcare, real estate, logistics, gaming, manufacturing, and next-generation DePIN networks. Aman’s strength lies in architecting high-performance systems, end-to-end platform engineering, and designing enterprise solutions that operate at global scale.