Ai Overview
A Web3 project is any application that interacts with blockchain networks, typically involving smart contracts, cryptocurrency wallets, and decentralized data storage. Unlike traditional web applications that rely on centralized servers and databases, Web3 applications execute business logic on blockchain through smart contracts that cannot be altered once deployed. Transactions cost gas fees but provide verifiable proof of execution.
Key Takeaways
- Web3 project setup requires Node.js, npm, VS Code, MetaMask wallet, and Hardhat framework as essential tools for building blockchain applications.
- Hardhat provides the best environment for beginners to write, compile, test, and deploy smart contracts with helpful error messages and local blockchain.
- Sepolia testnet is recommended for testing Web3 projects with free test ETH available from faucets without spending real cryptocurrency.
- Smart contracts written in Solidity define the business logic that executes on blockchain, requiring compilation before deployment.
- Frontend connection uses Ethers.js library to interact with deployed contracts, enabling users to read data and send transactions.
- MetaMask integration requires implementing connect wallet functionality, reading wallet addresses, and handling account change events properly.
- Contract ABI (Application Binary Interface) and deployed address are essential for frontend to communicate with smart contracts correctly.
- Common setup mistakes include wrong contract addresses, network mismatches, ABI errors, and insufficient gas for transactions.
- Testing on testnet before mainnet deployment prevents costly errors and ensures your Web3 application functions correctly.
- GitHub repository with clear README documentation helps others understand and run your Web3 project successfully.
Building your first Web3 project marks an exciting entry into blockchain technology and decentralized applications. Whether you are a JavaScript developer exploring blockchain or a complete beginner, this guide walks you through every step of Web3 project setup. Teams across the USA, UK, UAE, and Canada are increasingly building web3 platform solutions that leverage smart contracts and wallet connectivity. This comprehensive tutorial covers everything from installing tools through deploying your first contract and connecting a frontend interface.
What Is a Web3 Project?
A Web3 project is any application that interacts with blockchain networks, typically involving smart contracts, cryptocurrency wallets, and decentralized data storage. Unlike traditional web applications that rely on centralized servers and databases, Web3 applications execute business logic on blockchain through smart contracts that cannot be altered once deployed. This creates trustless systems where users can verify every transaction and interaction without relying on a central authority.
Web3 Project vs Traditional Web App
Traditional web applications store data in centralized databases controlled by the application owner. Users trust the company to handle their data responsibly. Web3 projects store critical data on blockchain where it becomes transparent and immutable. Authentication uses cryptographic wallets instead of usernames and passwords. Transactions cost gas fees but provide verifiable proof of execution. The backend logic lives in smart contracts rather than server code, fundamentally changing how applications operate.
Web3 vs Traditional Web Applications
Web3 Projects
- Data on blockchain (immutable)
- Wallet-based authentication
- Smart contract backend
- Transaction fees (gas)
- Decentralized ownership
Traditional Apps
- Data in databases (mutable)
- Username/password login
- Server-side backend
- Free to use (mostly)
- Company controlled
Key Differences
- Trust model fundamentally different
- Code execution is verifiable
- Users control their assets
- Transparency is built-in
- Censorship resistant
What You Need to Build a Basic Web3 App
Building a basic Web3 app requires understanding three core components: smart contracts, blockchain interaction libraries, and wallet connectivity. Smart contracts define your application logic and deploy to blockchain. Libraries like Ethers.js enable your frontend to communicate with contracts. Wallet integration allows users to sign transactions and prove ownership. You will also need basic JavaScript and HTML knowledge, though Solidity (the smart contract language) can be learned alongside this tutorial.
Tools You Need Before Starting
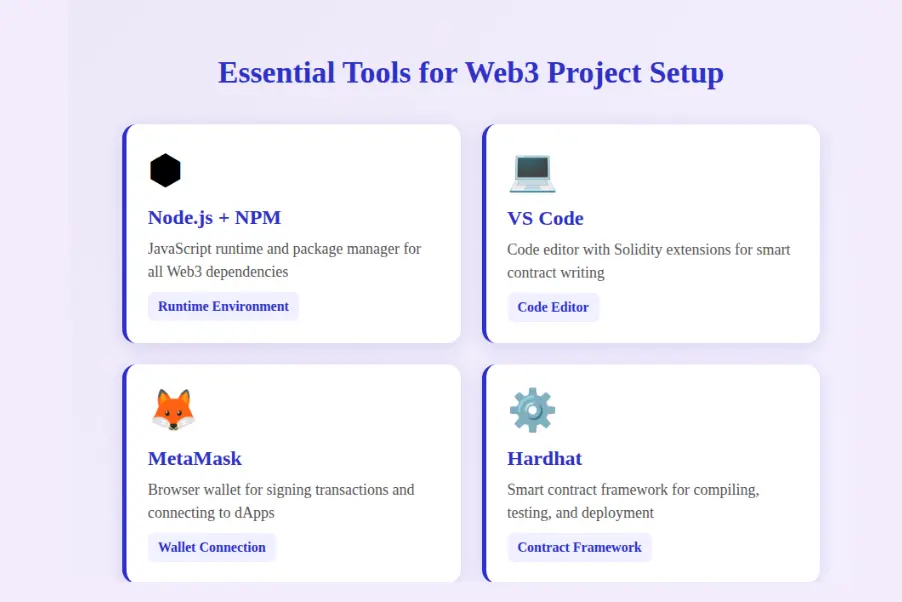
Before diving into Web3 project setup, you need to install several essential tools. These best tools to set up a Web3 project form the foundation for all blockchain work. Each tool serves a specific purpose in the workflow, from writing code to testing and deployment. Take time to install and configure each one properly before proceeding.
Node.js and NPM
Node.js provides the JavaScript runtime environment required by most Web3 tools. Download the LTS (Long Term Support) version from nodejs.org, which includes npm (Node Package Manager) automatically. Version 18 or higher is recommended for compatibility with modern packages. Verify installation by running “node –version” and “npm –version” in your terminal. npm manages all the packages and dependencies your Web3 project will use.
Code Editor (VS Code)
Visual Studio Code is the most popular code editor for Web3 projects, offering excellent Solidity support through extensions. Download VS Code from code.visualstudio.com and install the “Solidity” extension by Juan Blanco for syntax highlighting and error detection. The “Hardhat Solidity” extension provides additional features specific to Hardhat projects. These extensions make writing smart contracts significantly easier with autocomplete and inline error messages.
MetaMask Wallet
MetaMask is the essential browser wallet for Web3 projects, available as a Chrome, Firefox, or Edge extension. Install from metamask.io and create a new wallet, securely storing your seed phrase offline. MetaMask manages your accounts, signs transactions, and connects to different blockchain networks. For this Web3 project for beginners guide, you will use MetaMask to deploy contracts and test your application on testnets before mainnet.
Testnet Tokens (Faucet)
Testnet tokens are free cryptocurrency used for testing without risking real money. Faucets are websites that distribute free testnet tokens. For Sepolia testnet, use faucets like sepoliafaucet.com or the Alchemy Sepolia faucet. You typically need to enter your wallet address and may need to complete verification. Request tokens early since some faucets have daily limits. Having sufficient testnet ETH ensures smooth testing of your Web3 project.
Step 1 – Create Your Project Folder
Every Web3 project starts with proper folder organization. A well-structured project makes code management easier and helps other builders understand your work. This first step establishes the foundation for everything that follows in your Web3 project setup journey.
Folder Structure for a Web3 Project
Create a new folder for your project using the terminal command “mkdir my-web3-project” followed by “cd my-web3-project” to enter it. Initialize npm with “npm init -y” to create package.json. Your project will eventually contain: contracts folder for Solidity files, scripts folder for deployment scripts, test folder for contract tests, and a frontend folder for your web interface. This organization follows industry standards used by professionals.
Basic Files You Should Keep
Essential files include package.json for dependencies, hardhat.config.js for Hardhat settings, .env for sensitive data like private keys (never commit this), and .gitignore to exclude node_modules and .env from version control. Create a README.md explaining your project and setup steps. These files form the skeleton of any professional Web3 project and ensure others can understand and run your code.
Step 2 – Set Up Hardhat for Smart Contract Setup
Hardhat is the most popular smart contract framework for Ethereum projects. It provides everything needed to compile, deploy, test, and debug Solidity code. Hardhat includes a local blockchain network for testing, helpful error messages, and extensive plugin ecosystem. This tool is essential for professional Web3 project setup.
Install Hardhat
Installing Hardhat requires npm which you installed earlier. In your project folder, run “npm install –save-dev hardhat” to add it as a dependency. The –save-dev flag indicates this is for building, not production. After installation, run “npx hardhat init” and select “Create a JavaScript project” to generate the initial project structure with sample files.
Create a Sample Contract
Hardhat generates a sample Lock.sol contract in the contracts folder. This contract demonstrates basic Solidity syntax including state variables, constructor, and functions. While you will write your own contract later, reviewing this sample helps understand structure. The contract locks ETH until a specific timestamp, showcasing payable functions and time-based logic.
Compile the Contract
Compile your contracts using “npx hardhat compile” which transforms Solidity code into bytecode for deployment. Successful compilation creates an artifacts folder containing the ABI (Application Binary Interface) and bytecode. The ABI is crucial for frontend interaction. If compilation fails, Hardhat provides helpful error messages pointing to exact issues in your code.
Run a Local Blockchain Network
Hardhat includes a local blockchain network for testing. Run “npx hardhat node” to start it, which creates 20 test accounts each funded with 10000 ETH. This network runs on localhost:8545 and resets when stopped. Use it for rapid testing during contract building before deploying to public testnets. The local network provides instant transaction confirmations.
Step 3 – Write Your First Smart Contract
Smart contracts are the core of any Web3 project, containing the business logic that executes on blockchain. For Web3 project for beginners, start with a simple contract that stores and retrieves a value. This teaches fundamental concepts without overwhelming complexity. Understanding contract structure prepares you for building more sophisticated applications.
Simple Example Contract
Create a new file called SimpleStorage.sol in your contracts folder. This contract stores a number that anyone can update and read. The contract includes a state variable to store the number, a function to set the value, and a function to retrieve it. This pattern appears in countless real-world contracts, making it perfect for learning the basics of create Web3 app workflows.
Key Parts of a Smart Contract
Every Solidity contract begins with a pragma statement specifying the compiler version. The contract keyword defines the contract body. State variables store data permanently on blockchain. Functions define actions the contract can perform. View functions read data without gas costs, while other functions modify state and require gas. Events emit logs that frontends can listen to.
Smart Contract Components Explained
Pragma: Declares Solidity version (e.g., pragma solidity ^0.8.19) to ensure compiler compatibility.
State Variables: Store permanent data on blockchain, like uint256 storedNumber that persists between calls.
Constructor: Runs once during deployment to initialize contract state with starting values.
Functions: Define contract behavior. Use view for read-only, payable for receiving ETH.
Events: Emit logs for frontend listening. Indexed parameters enable efficient filtering.
Modifiers: Add reusable conditions to functions like onlyOwner for access control.
Common Errors Beginners Face
Beginners often encounter compiler errors like “TypeError: Type mismatch” when passing wrong data types to functions. Missing semicolons cause syntax errors. Forgetting the view keyword on read-only functions wastes gas. Visibility modifiers (public, private, internal, external) must be specified explicitly in newer Solidity versions. Hardhat provides detailed error messages that help identify and fix these issues quickly.
Step 4 – Deploy the Contract on a Testnet
After testing locally, deploy to a public testnet to verify everything works in a real blockchain environment. Testnets mirror mainnet behavior without using real cryptocurrency. This step is crucial for build a Web3 project step by step because it reveals issues that local testing might miss, such as gas estimation and network latency.
Choose a Testnet (Sepolia Recommended)
Sepolia is the recommended Ethereum testnet, supported by the Ethereum Foundation and all major tools. It provides reliable block production and easy faucet access. Other options include Goerli (being deprecated) and Holesky. For non-Ethereum projects, use chain-specific testnets like Mumbai for Polygon or Arbitrum Sepolia. Choose testnets that your target deployment chain supports.
Add RPC and Network in MetaMask
MetaMask needs network configuration to connect to testnets. Click the network dropdown, select “Add Network,” and enter Sepolia details: Network Name (Sepolia), RPC URL (from Infura or Alchemy), Chain ID (11155111), Currency Symbol (SepoliaETH), Block Explorer (sepolia.etherscan.io). Using Infura or Alchemy provides reliable RPC endpoints. Save and switch to this network.
Get Free Testnet ETH
Visit Sepolia faucets to receive free testnet ETH for deployment and testing. Popular options include sepoliafaucet.com, Alchemy Sepolia faucet, and Infura faucet. Enter your wallet address and complete any verification. Request 0.5 ETH which is sufficient for many deployments. If one faucet is empty, try another. Most faucets have daily limits per address.
Deploy Contract and Save the Address
Create a deployment script in the scripts folder. Configure hardhat.config.js with your network settings and private key (stored in .env). Run “npx hardhat run scripts/deploy.js –network sepolia” to deploy. The console displays your contract address. Save this address immediately as you need it for frontend integration. Verify the contract on Etherscan for transparency.
Step 5 – Create a Frontend for Your Web3 App
With your smart contract deployed, create a frontend interface for users to interact with it. The frontend connects to MetaMask, reads contract data, and sends transactions. This is where your create Web3 app vision becomes a usable product that real users can experience.
Create a Simple UI
Create a frontend folder in your project and add index.html. Start with a basic HTML structure including a connect wallet button, input field for data, and buttons to read and write contract data. You can use plain HTML/JavaScript for simplicity or frameworks like React or Vue for larger projects. Focus on functionality first, then improve the design.
Install Ether.js
Ethers.js is the modern library for Ethereum interaction. For browser projects, include it via CDN or npm. Add the script tag from cdnjs or unpkg to your HTML file. Ethers.js provides the ethers object with utilities for connecting to wallets, creating contract instances, and sending transactions. Version 6 is the latest with improved syntax over version 5.
Store Contract ABI and Address
Create a constants.js file storing your contract address and ABI. Copy the ABI from artifacts/contracts/YourContract.sol/YourContract.json after compilation. The ABI defines function signatures that enable frontend communication with the contract. Export these as constants that your main JavaScript file imports. Update the address whenever you redeploy the contract.
Step 6 – Connect MetaMask Wallet
Wallet connection enables users to interact with your Web3 application. MetaMask provides the signer needed to approve transactions. This step transforms your frontend from a static page into an interactive Web3 app that users can actually use to interact with blockchain.
MetaMask Wallet Connection Flow
Check MetaMask Installed
Verify window.ethereum exists before attempting connection to handle users without wallet.
Request Account Access
Call eth_requestAccounts to prompt MetaMask popup asking user to approve connection.
Get Wallet Address
Retrieve connected address from response array and display in UI for user confirmation.
Create Contract Instance
Use address, ABI, and signer to create contract instance for calling functions.
Add “Connect Wallet” Button
Add a button in your HTML with an onclick handler. The handler checks if window.ethereum exists (MetaMask installed), then calls ethereum.request with method eth_requestAccounts. This triggers the MetaMask popup. On success, store the returned address in a variable and update the UI to show the connected state. Provide clear feedback during the connection process.
Read Wallet Address
After connection, the eth_requestAccounts method returns an array of addresses. The first element (accounts[0]) is the primary address. Display this address in your UI, typically truncated (like 0x1234…5678) for readability. Store the full address in a variable for later use in transactions. This address identifies the user throughout their session.
Handle Wallet Disconnect / Account Change
Users may switch accounts or disconnect during a session. Listen to MetaMask events to handle these changes. Add listeners for “accountsChanged” and “chainChanged” events on the ethereum object. When accounts change, update your UI and potentially reconnect. When the chain changes, verify the user is on the correct network and prompt switching if needed.
Step 7 – Call Smart Contract Functions
With wallet connected and contract instance ready, you can now call contract functions. Reading data is free and instant. Writing data costs gas and requires transaction confirmation. Understanding this difference is fundamental to building responsive Web3 applications that users enjoy.
Read Data from the Contract
Call view functions on your contract instance to read data without spending gas. Using Ethers.js, call contract.functionName() which returns a promise. Await the result and display it in your UI. For example, if your contract has getStoredNumber(), call await contract.getStoredNumber() and display the returned value. Reading is instant and free.
Write Data (Send a Transaction)
Write functions modify blockchain state and require transactions. Call contract.setNumber(value) which triggers MetaMask to show a transaction confirmation popup. The user must approve and pay gas. After approval, the transaction broadcasts to the network. Use await tx.wait() to wait for confirmation before updating your UI with success status.
Show Transaction Status in UI
Good UX requires clear transaction status feedback. Show “Waiting for approval” when MetaMask popup appears. Display “Transaction pending” after approval with a link to the block explorer using the transaction hash. Show “Transaction confirmed” with success indicator when complete. Handle errors gracefully with clear messages explaining what went wrong.
Common Mistakes in First Web3 Project Setup
Even experienced builders make mistakes during Web3 project setup. Understanding common pitfalls helps you avoid them and debug issues faster. These problems affect builders across the USA, UK, UAE, and Canada, regardless of experience level.
| Mistake | Cause | Solution |
|---|---|---|
| Wrong Contract Address | Using old address after redeployment | Always update address in constants after deploying |
| Wrong Network Selected | MetaMask on different network than contract | Add network verification and switch prompts |
| ABI Mismatch | ABI not updated after contract changes | Recompile and copy fresh ABI from artifacts |
| Gas Errors | Insufficient gas or estimation failure | Add gas limit overrides and handle reverts |
| Private Key Exposure | Committing .env to version control | Add .env to .gitignore before first commit |
Wrong Contract Address
Every deployment creates a new contract address. Using an old address means your frontend cannot find the contract. This is the most common mistake in Web3 project setup. Always save the new address immediately after deployment. Consider automating address updates in your build process or using a configuration file that updates automatically.
Wrong Network Selected
Your contract exists on a specific network. If MetaMask connects to a different network, transactions fail with confusing errors. Implement network checking on connection that compares wallet chain ID against your expected network. Use wallet_switchEthereumChain to prompt users to switch networks automatically when mismatched.
ABI Mismatch
The ABI defines function signatures. When you modify contract code and redeploy, the old ABI no longer matches. Function calls fail or return incorrect data. After every contract change and compilation, copy the updated ABI from the artifacts folder. Consider creating a build script that automatically copies ABI to your frontend folder.
Gas / Transaction Errors
Gas errors occur when transactions run out of gas or estimation fails. Some contracts require higher gas limits, especially with complex logic or loops. Override gas limits when calling functions if needed. Reverts happen when contract requirements are not met. Parse error messages to display meaningful information to users about why their transaction failed.
Final Checklist Before You Share Your Project
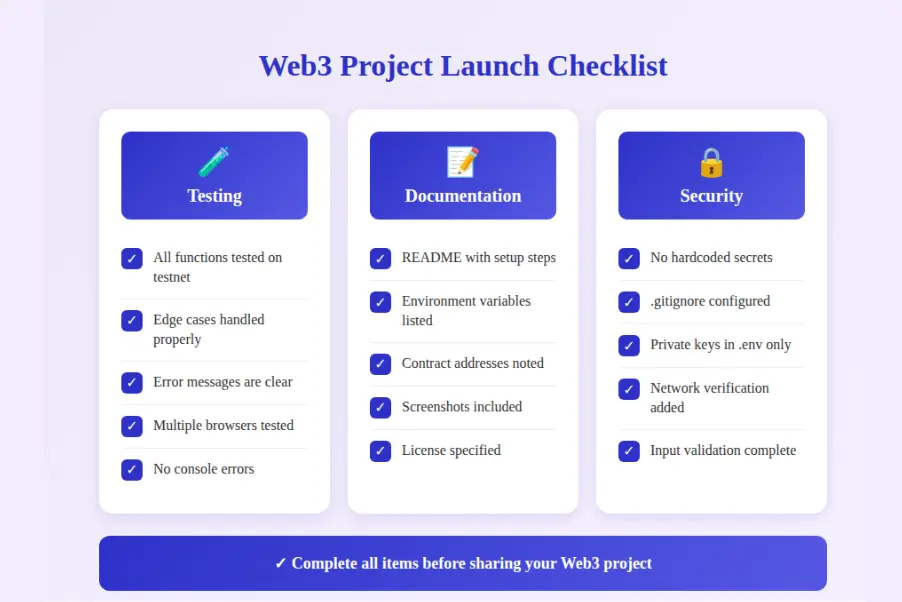
Before sharing your Web3 project with others, complete this checklist to ensure quality and usability. A polished project demonstrates professionalism and makes collaboration easier. These final steps separate hobby projects from portfolio-worthy work.
Project Readiness Criteria
Step 1: Testing
- All functions tested on testnet
- Edge cases handled properly
- Error messages are clear
- No console errors
Step 2: Documentation
- README with setup steps
- Environment variables listed
- Contract addresses noted
- Screenshots included
Step 3: Code Quality
- No hardcoded secrets
- .gitignore configured
- Clean code structure
- Comments where needed
Test Everything on Testnet
Thorough testnet testing catches issues before they affect real users or cost real money. Test every function your UI calls. Try edge cases like entering zero, large numbers, or empty strings. Test with different wallets and browsers. Verify error handling works correctly. Only proceed to mainnet after exhaustive testnet validation confirms everything works as expected.
Add README and Setup Steps
A good README enables others to run your project. Include project description, prerequisites (Node version, etc.), installation steps, environment variable setup (.env.example), how to compile and deploy contracts, and how to run the frontend. Add screenshots showing the working application. List any known issues or limitations. This documentation demonstrates professionalism.
Push Code to GitHub
Version control with Git and hosting on GitHub makes your project accessible and demonstrates collaboration readiness. Ensure .gitignore excludes node_modules, .env, and artifacts/cache folders. Write meaningful commit messages describing changes. Create a public repository and push your code. Add topics like “web3”, “ethereum”, and “solidity” to improve discoverability.
Web3 Project Setup Best Practices
Practice 1: Never commit private keys or seed phrases to version control under any circumstances.
Practice 2: Always test on testnet before deploying to mainnet to prevent costly mistakes.
Practice 3: Update contract address and ABI in frontend after every redeployment.
Practice 4: Implement network verification to ensure users connect to the correct blockchain.
Practice 5: Provide clear transaction status feedback throughout the approval and confirmation process.
Practice 6: Handle wallet disconnect and account change events for robust user experience.
Practice 7: Use environment variables for all configurable values like RPC URLs and API keys.
Practice 8: Document your project thoroughly with README, setup steps, and code comments.
Final Thoughts
You have now completed your first Web3 project setup, learning the essential skills to build a Web3 project step by step. From installing Node.js and Hardhat through writing smart contracts, deploying to testnet, and connecting a frontend with MetaMask, you have experienced the complete workflow. These best tools to set up a Web3 project form the foundation for more complex applications. Practice by modifying the contract, adding new features, and exploring advanced topics. Teams across the USA, UK, UAE, and Canada continue building innovative blockchain solutions using these same fundamentals. Keep experimenting, and remember that every expert builder started exactly where you are now.
Ready to Build Your First Web3 Project?
Partner with our experienced team to accelerate your blockchain journey and create professional Web3 applications.
Frequently Asked Questions
Q1.What is the easiest way to set up a Web3 project for beginners?
The easiest Web3 project setup for beginners starts with installing Node.js, VS Code, and MetaMask wallet. Use Hardhat as your smart contract framework since it provides helpful error messages and built-in testing. Start with Sepolia testnet for free testing without real money. Follow structured tutorials that guide you through folder creation, contract writing, and frontend connection step by step.
Q2.What tools do I need to create a Web3 app?
Essential tools to set up a Web3 project include Node.js (version 18+) for JavaScript runtime, npm for package management, and VS Code as your code editor. Install MetaMask browser extension for wallet connectivity. Use Hardhat or Foundry for smart contract compilation and deployment. Ethers.js or Web3.js libraries connect your frontend to blockchain. Get testnet tokens from faucets for testing.
Q3.How long does it take to build a Web3 project step by step?
A basic Web3 project setup takes 2 to 4 hours for someone with JavaScript knowledge. This includes environment setup (30 minutes), writing a simple smart contract (1 hour), deploying to testnet (30 minutes), and creating a basic frontend (1 to 2 hours). Complex projects with multiple contracts, advanced features, and security audits require weeks or months depending on scope.
Q4.Do I need to know Solidity to create a Web3 app?
Yes, Solidity knowledge is essential for building Web3 applications on Ethereum and EVM-compatible chains. Solidity is the primary smart contract programming language. However, you can start learning while building. Basic JavaScript knowledge helps since Solidity shares similar syntax. Many tutorials teach Solidity fundamentals alongside Web3 project setup, making the learning curve manageable for beginners.
Q5.What is the best testnet for Web3 project setup?
Sepolia is currently the best testnet for Web3 project setup and is recommended by Ethereum Foundation. It provides reliable block production, easy faucet access for free test ETH, and close similarity to mainnet behavior. Goerli was previously popular but is being deprecated. For other chains, use their official testnets like Mumbai for Polygon or Arbitrum Sepolia.
Q6.How do I connect MetaMask to my Web3 project?
Connect MetaMask to your Web3 project using Ethers.js or Web3.js libraries. Create a connect wallet button that calls the eth_requestAccounts method. MetaMask will prompt users to approve the connection. After approval, retrieve the wallet address using provider.getSigner(). Listen for account and chain change events to keep your app synchronized with wallet state changes.
Q7.What are common mistakes beginners make in Web3 project setup?
Common Web3 project setup mistakes include using wrong contract addresses after redeployment, selecting incorrect networks in MetaMask, ABI mismatches when contract code changes, and insufficient gas for transactions. Beginners often forget to save deployed contract addresses, skip testnet testing, or hardcode values that should be configurable. Always test thoroughly on testnets before mainnet deployment.
Explore Services
Related Services
Reviewed by

Aman Vaths
Founder of Nadcab Labs
Aman Vaths is the Founder & CTO of Nadcab Labs, a global digital engineering company delivering enterprise-grade solutions across AI, Web3, Blockchain, Big Data, Cloud, Cybersecurity, and Modern Application Development. With deep technical leadership and product innovation experience, Aman has positioned Nadcab Labs as one of the most advanced engineering companies driving the next era of intelligent, secure, and scalable software systems. Under his leadership, Nadcab Labs has built 2,000+ global projects across sectors including fintech, banking, healthcare, real estate, logistics, gaming, manufacturing, and next-generation DePIN networks. Aman’s strength lies in architecting high-performance systems, end-to-end platform engineering, and designing enterprise solutions that operate at global scale.